This was a really beneficial class, because I learned many techniques and tricks that helped me improve my photography. I came into this class with a small understanding of photography and how to use my camera, and after taking this class I really understand how to use my camera and how to get a nearly perfect picture every time. Below are 3 things that I will be taking with me so that I can continue to make photography a hobby of mine.
1. Always shoot in RAW format, it will improve editing and it will transform a boring picture into a work of art.
2. Don't let the camera do the work for you, shoot in manual mode! It will help you get the shot you are wanting as well as help you understand the settings of your camera.
3. Don't settle for the first picture that you take of something. Shoot at different angles to capture a totally different perspective.
Tuesday, December 10, 2019
Monday, December 2, 2019
Final Blog
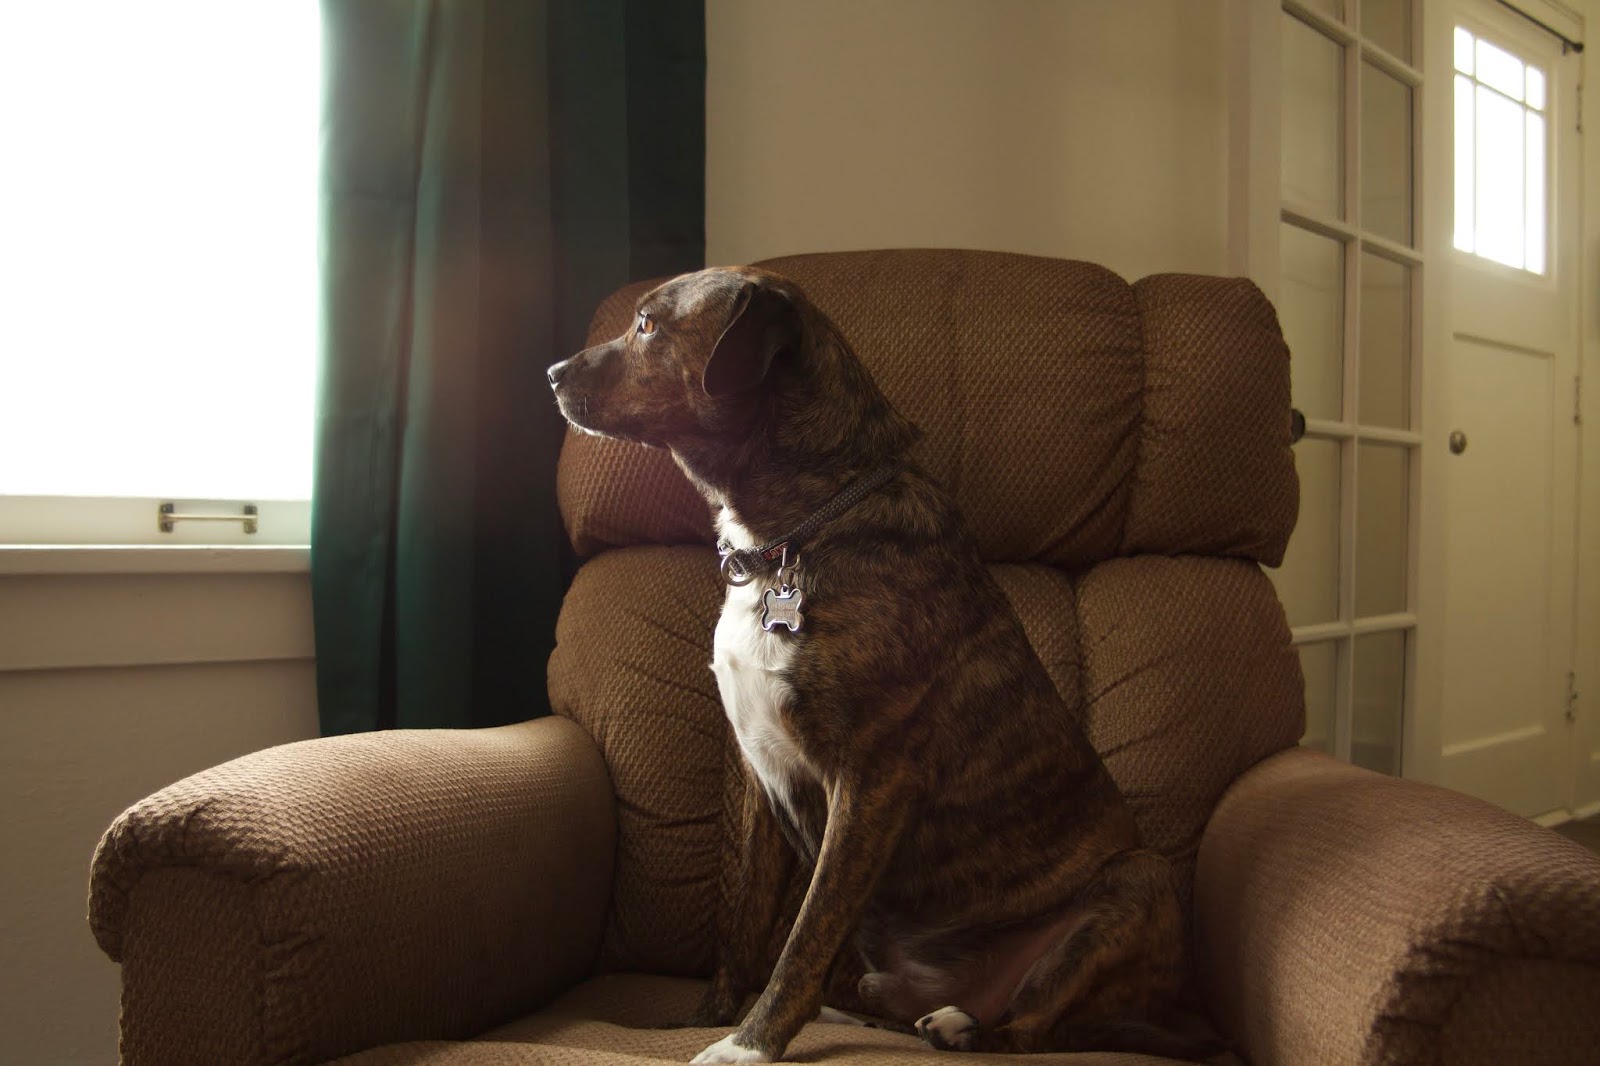
Photo #1
Location: Riverfront Park
Camera: Canon 7D
Lens: Tamron 19-35 F/3.5-4.5
Focal Length: 23mm
Aperture: F/9
Shutter Speed: 1/200 sec
ISO: 100

Photo #2
Location: Alvord Desert, Oregon
Camera: Canon 7D
Lens: Tamron 19-35 F/3.5-4.5
Focal Length: 19mm
Aperture: F/8
Shutter Speed: 1/500 sec
ISO: 100

Photo #3
Location: Back Nine
Camera: Canon 7D
Lens: Tamron 19-35 F/3.5-4.5
Focal Length:
Aperture: F/9
Shutter Speed: 1/160 sec
ISO: 400

Photo #4
Location: Back Nine
Camera: Canon 7D
Lens: Tamron 19-35 F/3.5-4.5
Focal Length: 27mm
Aperture: F/4.5
Shutter Speed: 1/160 sec
ISO: 250

Photo #5
Location: Back Nine
Camera: Canon 7D
Lens: Tamron 19-35 F/3.5-4.5
Focal Length: 19mm
Aperture: F/3.5
Shutter Speed: 1/640 sec
ISO: 200

Photo #6
Location: Back Nine
Camera: Canon 7D
Lens: Tamron 19-35 F/3.5-4.5
Focal Length: 35mm
Aperture: F/4.5
Shutter Speed: 1/80 sec
ISO: 160

Photo #7
Location: Back Nine
Camera: Canon 7D
Lens: Tamron 19-35 F/3.5-4.5
Focal Length: 35mm
Aperture: F/4.5
Shutter Speed: 1/80 sec
ISO: 160

Photo #8
Location: Back Nine
Camera: Canon 7D
Lens: Tamron 19-35 F/3.5-4.5
Focal Length: 35mm
Aperture: F/16
Shutter Speed: 1/50 sec
ISO: 400

Photo #9
Location: Back Nine
Camera: Canon 7D
Lens: Tamron 19-35 F/3.5-4.5
Focal Length: 24mm
Aperture: F/9
Shutter Speed: 1/160 sec
ISO: 250

Photo #10
Location: Yellowstone River
Camera: Canon 7D
Lens: Tamron 19-35 F/3.5-4.5
Focal Length: 19mm
Aperture: F/13
Shutter Speed: 1/250 sec
ISO: 400

Photo #11
Location: Yellowstone River
Camera: Canon 7D
Lens: Tamron 19-35 F/3.5-4.5
Focal Length: 19mm
Aperture: F/11
Shutter Speed: 1/320 sec
ISO: 400

Photo #12
Location: Two Moon Park
Camera: Canon 7D
Lens: Tamron 19-35 F/3.5-4.5
Focal Length: 19mm
Aperture: F/10
Shutter Speed: 1/50 sec
ISO: 500

Photo #13
Location: Two Moon Park
Camera: Canon 7D
Lens: Tamron 19-35 F/3.5-4.5
Focal Length: 19mm
Aperture: F/3.5
Shutter Speed: 1/100 sec
ISO: 400

Photo #14
Location: Two Moon Park
Camera: Canon 7D
Lens: Tamron 19-35 F/3.5-4.5
Focal Length: 19mm
Aperture: F/8
Shutter Speed: 1/25 sec
ISO: 320

Photo #15
Location: Two Moon Park
Camera: Canon 7D
Lens: Tamron 19-35 F/3.5-4.5
Focal Length: 35mm
Aperture: F/9
Shutter Speed: 1/10 sec
ISO: 200

Photo #16
Location: Two Moon Park
Camera: Canon 7D
Lens: Tamron 19-35 F/3.5-4.5
Focal Length: 27mm
Aperture: F/10
Shutter Speed: 1/4 sec
ISO: 320

Photo #17
Location: Two Moon Park
Camera: Canon 7D
Lens: Tamron 19-35 F/3.5-4.5
Focal Length: 19mm
Aperture: F/7.1
Shutter Speed: 1/125 sec
ISO: 320

Photo #18
Location: Two Moon Park
Camera: Canon 7D
Lens: Tamron 19-35 F/3.5-4.5
Focal Length: 19mm
Aperture: F/3.5
Shutter Speed: 1/80 sec
ISO: 320

Photo #19
Location: Yellowstone River
Camera: Canon 7D
Lens: Tamron 19-35 F/3.5-4.5
Focal Length: 19mm
Aperture: F/10
Shutter Speed: 1/200 sec
ISO: 100

Photo #20
Location: Swords Park
Camera: Canon 7D
Lens: Tamron 19-35 F/3.5-4.5
Focal Length: 19mm
Aperture: F/16
Shutter Speed: 1/50 sec
ISO: 100

Photo #21
Location: Swords Park
Camera: Canon 7D
Lens: Canon EF 50mm F/1.8
Focal Length: 50mm
Aperture: F/9
Shutter Speed: 1/30 sec
ISO: 200

Photo #22
Location: Swords Park
Camera: Canon 7D
Lens: Tamron 19-35 F/3.5-4.5
Focal Length: 19mm
Aperture: F/3.5
Shutter Speed: 1/250 sec
ISO: 200

Photo #23
Location: Swords Park
Camera: Canon 7D
Lens: Tamron 19-35 F/3.5-4.5
Focal Length: 19mm
Aperture: F/3.5
Shutter Speed: 1/320 sec
ISO: 100

Photo #24
Location: Riverfront Park
Camera: Canon 7D
Lens: Tamron 19-35 F/3.5-4.5
Focal Length: 19mm
Aperture: F/8
Shutter Speed: 1/125 sec
ISO: 100

Photo #25
Location: Swords Park
Camera: Canon 7D
Lens: Canon EF 50mm F/1.8
Focal Length:
Aperture: F/4
Shutter Speed: 1/500 sec
ISO: 200

Location: Riverfront Park
Camera: Canon 7D
Lens: Tamron 19-35 F/3.5-4.5
Focal Length: 23mm
Aperture: F/9
Shutter Speed: 1/200 sec
ISO: 100

Photo #2
Location: Alvord Desert, Oregon
Camera: Canon 7D
Lens: Tamron 19-35 F/3.5-4.5
Focal Length: 19mm
Aperture: F/8
Shutter Speed: 1/500 sec
ISO: 100

Photo #3
Location: Back Nine
Camera: Canon 7D
Lens: Tamron 19-35 F/3.5-4.5
Focal Length:
Aperture: F/9
Shutter Speed: 1/160 sec
ISO: 400

Photo #4
Location: Back Nine
Camera: Canon 7D
Lens: Tamron 19-35 F/3.5-4.5
Focal Length: 27mm
Aperture: F/4.5
Shutter Speed: 1/160 sec
ISO: 250

Photo #5
Location: Back Nine
Camera: Canon 7D
Lens: Tamron 19-35 F/3.5-4.5
Focal Length: 19mm
Aperture: F/3.5
Shutter Speed: 1/640 sec
ISO: 200

Photo #6
Location: Back Nine
Camera: Canon 7D
Lens: Tamron 19-35 F/3.5-4.5
Focal Length: 35mm
Aperture: F/4.5
Shutter Speed: 1/80 sec
ISO: 160

Photo #7
Location: Back Nine
Camera: Canon 7D
Lens: Tamron 19-35 F/3.5-4.5
Focal Length: 35mm
Aperture: F/4.5
Shutter Speed: 1/80 sec
ISO: 160

Photo #8
Location: Back Nine
Camera: Canon 7D
Lens: Tamron 19-35 F/3.5-4.5
Focal Length: 35mm
Aperture: F/16
Shutter Speed: 1/50 sec
ISO: 400

Photo #9
Location: Back Nine
Camera: Canon 7D
Lens: Tamron 19-35 F/3.5-4.5
Focal Length: 24mm
Aperture: F/9
Shutter Speed: 1/160 sec
ISO: 250

Photo #10
Location: Yellowstone River
Camera: Canon 7D
Lens: Tamron 19-35 F/3.5-4.5
Focal Length: 19mm
Aperture: F/13
Shutter Speed: 1/250 sec
ISO: 400

Photo #11
Location: Yellowstone River
Camera: Canon 7D
Lens: Tamron 19-35 F/3.5-4.5
Focal Length: 19mm
Aperture: F/11
Shutter Speed: 1/320 sec
ISO: 400

Photo #12
Location: Two Moon Park
Camera: Canon 7D
Lens: Tamron 19-35 F/3.5-4.5
Focal Length: 19mm
Aperture: F/10
Shutter Speed: 1/50 sec
ISO: 500

Photo #13
Location: Two Moon Park
Camera: Canon 7D
Lens: Tamron 19-35 F/3.5-4.5
Focal Length: 19mm
Aperture: F/3.5
Shutter Speed: 1/100 sec
ISO: 400

Photo #14
Location: Two Moon Park
Camera: Canon 7D
Lens: Tamron 19-35 F/3.5-4.5
Focal Length: 19mm
Aperture: F/8
Shutter Speed: 1/25 sec
ISO: 320

Photo #15
Location: Two Moon Park
Camera: Canon 7D
Lens: Tamron 19-35 F/3.5-4.5
Focal Length: 35mm
Aperture: F/9
Shutter Speed: 1/10 sec
ISO: 200

Photo #16
Location: Two Moon Park
Camera: Canon 7D
Lens: Tamron 19-35 F/3.5-4.5
Focal Length: 27mm
Aperture: F/10
Shutter Speed: 1/4 sec
ISO: 320

Photo #17
Location: Two Moon Park
Camera: Canon 7D
Lens: Tamron 19-35 F/3.5-4.5
Focal Length: 19mm
Aperture: F/7.1
Shutter Speed: 1/125 sec
ISO: 320

Photo #18
Location: Two Moon Park
Camera: Canon 7D
Lens: Tamron 19-35 F/3.5-4.5
Focal Length: 19mm
Aperture: F/3.5
Shutter Speed: 1/80 sec
ISO: 320

Photo #19
Location: Yellowstone River
Camera: Canon 7D
Lens: Tamron 19-35 F/3.5-4.5
Focal Length: 19mm
Aperture: F/10
Shutter Speed: 1/200 sec
ISO: 100

Photo #20
Location: Swords Park
Camera: Canon 7D
Lens: Tamron 19-35 F/3.5-4.5
Focal Length: 19mm
Aperture: F/16
Shutter Speed: 1/50 sec
ISO: 100

Photo #21
Location: Swords Park
Camera: Canon 7D
Lens: Canon EF 50mm F/1.8
Focal Length: 50mm
Aperture: F/9
Shutter Speed: 1/30 sec
ISO: 200

Photo #22
Location: Swords Park
Camera: Canon 7D
Lens: Tamron 19-35 F/3.5-4.5
Focal Length: 19mm
Aperture: F/3.5
Shutter Speed: 1/250 sec
ISO: 200

Photo #23
Location: Swords Park
Camera: Canon 7D
Lens: Tamron 19-35 F/3.5-4.5
Focal Length: 19mm
Aperture: F/3.5
Shutter Speed: 1/320 sec
ISO: 100

Photo #24
Location: Riverfront Park
Camera: Canon 7D
Lens: Tamron 19-35 F/3.5-4.5
Focal Length: 19mm
Aperture: F/8
Shutter Speed: 1/125 sec
ISO: 100

Photo #25
Location: Swords Park
Camera: Canon 7D
Lens: Canon EF 50mm F/1.8
Focal Length:
Aperture: F/4
Shutter Speed: 1/500 sec
ISO: 200

Saturday, November 30, 2019
ART247-Blog #13
Lightroom RAW edit before & after!
Settings-
Location: Alvord Desert, Oregon
Camera: Canon 7D
Lens: Tamron 19-35 F/3.5-4.5
Focal Length: 24mm
Aperture: F/20
Shutter Speed: 1/80 sec
ISO: 100
BEFORE:

AFTER:

Settings-
Location: Alvord Desert, Oregon
Camera: Canon 7D
Lens: Tamron 19-35 F/3.5-4.5
Focal Length: 24mm
Aperture: F/20
Shutter Speed: 1/80 sec
ISO: 100
BEFORE:

AFTER:

ART 247- Blog #12
Lightroom RAW edit before & after!
Settings-
Location: Billings, MT
Camera: Canon 7D
Lens: Canon EF 50mm F/1.8
Aperture: F/4
Shutter Speed: 1/800sec
ISO: 200
BEFORE:

AFTER:

Settings-
Location: Billings, MT
Camera: Canon 7D
Lens: Canon EF 50mm F/1.8
Aperture: F/4
Shutter Speed: 1/800sec
ISO: 200
BEFORE:

AFTER:

Wednesday, November 20, 2019
ART 247- Blog #11
Article: https://www.sportdiver.com/five-tips-to-get-started-in-underwater-photography
For this week's blog I decided to change it up a bit and find an article about underwater photography. Underwater photography sounds like a lot of fun, because you can capture pictures of things that you're not accustomed to seeing every day. I don't make it the ocean very often but hopefully one day I'll get the opportunity take photos underwater.
The article discusses 5 tips for beginner photographers to get started in underwater photography. The first and most important tip the article discusses is getting to know your camera better as well as become a good diver/swimmer. If you don't know how to swim/dive and you don't know how to use your camera effectively then you won't be able to capture the pictures that you want.
The article also suggests starting small with the amount of gear you carry. If you are swimming around with big, bulky gear then you won't be able to move quicker and get the shot you want. Another important tip is to approach the sea-life slowly because if you rush up on them to get the shot they will swim in the opposite direction. Lastly, the article suggests getting a underwater guide who will take you to the spots that have the best potential for photos.
Saturday, November 9, 2019
ART 247- Blog #10
Article: https://www.creativelive.com/blog/low-light-photography-dslr-tips-for-making-the-most-of-dark-scenes
Since the days are shorter and the sun sets around 4 o'clock every day, I thought it would be most appropriate to find an article that discusses low-light photography techniques. The majority of the pictures I take are in the early morning hours before the sunrise and late afternoon before the sunset. When taking these photos I really have to worry about drastically changing my ISO values, and while editing my photos I have to worry about areas that are too under-exposed.
When taking pictures in lowlight the most important piece of equipment is a tripod because the shutter speed will be slower. Slow shutter speeds introduce camera shake and that in turn makes photos more blurry. I have found that a tripod helps in keeping my photos clear, stabilized, and aligned within the rule of thirds. The other piece of equipment the article said is important is using a remote release. A remote release is an external switch that prevents motion blur because you don't have to touch the camera's shutter when taking the picture.
When shooting in low-light it is important to select shutter priority or manual mode because then you have the ability to manipulate the photo's settings easier. The most important setting in lowlight conditions would be the shutter speed. Through shutter priority you are able to select the shutter speed and all the other camera settings will auto adjust and compensate for that setting.
Another important function of lowlight shooting is the ISO values of your camera. Most entry level DSLR's don't produce a good clear image unless you lower the ISO values down to the lowest settings like 100-200. My camera produces the best quality images at 100 ISO, but for lowlight capability I can only go up to 400 ISO. When editing a RAW photo at 100 ISO I am able to recover a lot of light and details. When I edit a RAW photo at 400 ISO I am able to recover details but I notice that the quality of the image suffers.
The last way to improve your low-light photography is using the lowest aperture settings that your lens can go to. When you use the lowest aperture setting on your lens it allows more light to enter the camera sensor and will improve the light quality in the image so that you don't have to raise the ISO values and risk the quality of the image.


Monday, November 4, 2019
ART 247- Blog 9
Article: https://www.nationalgeographic.com/adventure/features/interview-photographer-climber-jimmy-chin-master-art-of-chill/
For this week's blog I decided to find an article about a professional photographer. This article is titled Photographer Jimmy Chin on Mastering the Art of Chill. I have always been intrigued with Chin's photography and videography because he goes above and beyond to get the perfect shot.
Chin was a typical climber/dirt bag and he lived in the back of his car inside Yosemite National Park. While on climb up El Capitan, Chin took a picture of his friend with the sunrise in the backdrop. They sold the picture for $500 then Chin went out to buy his first camera at the age of 20. At age 23 Chin went on a climbing expedition with his friend Brady Robinson in the Karakoram mountains in Pakistan and documented the trip with his camera. Soon after the trip, Chin's pictures started showing up in many outdoor magazines and from that moment he knew he was in the photography game.
Chin is now in his late 40's and he is a world renowned photographer/director working for the North Face and National Geographic. One of his biggest projects was being a director, videographer, and photographer for the movie Free Solo which took many years documenting the life of Alex Honnold in his quest to free solo El Capitan. I feel that I relate on some level to Chin, because he has a passion for skiing and climbing and so do I. He uses photography as a tool to document the activities that he loves to do and that is what I aspire to do as well if I become good at photography.


Wednesday, October 30, 2019
ART 247- Blog 8
Article:https://www.slrlounge.com/workshop/crop-vs-full-frame-cameras/
For this week's blog i found an article that discusses the differences between a crop frame sensor camera and a full frame sensor camera. I have always owned a crop frame sensor camera because they are cheaper bodies and the glass for crop frame are cheaper as well. I hope to someday purchase a full frame camera body, but I want to be able to make good photos with my crop frame before i invest in something new.
The main difference between crop frame and full frame cameras is the sensor size. A full frame sensor will be 35mm. Crop sensors can be any size that's smaller than 35mm. The other difference between the two sensors is the field of view. When taking a picture with a crop frame camera and taking a picture with a full frame camera with the same lens both images will appear similar but the crop frame camera will produce a narrower field of view and the entire scene won't be captured in the image (as represented in the image below)
Most Crop frame sensors have a 1.5 to 1.6x multiplier which means that whatever focal length is used is multiplied to the magnification of the image. So for example if you took a picture with a crop frame camera and used a 50mm focal length, then the actual focal length would be 80mm.

Thursday, October 24, 2019
ART 247- Blog 7
Article: https://expertphotography.com/snow-photography/
For this weeks blog post I decided to research tips and tricks for snow photography. Since winter is right around the corner and the majority of my landscape shots this semester will be in the snow, I felt that it would be helpful to find ways to improve my photography this coming winter. This winter I plan on going outside a lot to take pictures in the snow, because I have a durable water proof camera, and I won't be able to find any landscapes that aren't covered with snow.
This article outlines 15 different tips that will help improve winter photography. One of the tips that I found most interesting was going outside during snowstorms to capture pictures. During snow storms, people tend to stay indoors and they end up missing out on all the good shots. Taking photos early in the morning is one of the best times of the day to get photos of fully developed snowflakes because the temperature is colder and the snow hasn't melted yet.
Another tip that I found helpful is creating bokeh images with the snow. This can be accomplished by focusing on an object and having a swirling/blurry effect in the background. I have experimented with bokeh in the past and I have found that it's only effective to create bokeh with a wide aperture lens such as a 50mm F/1.8. I never use the flash on my camera, but the article states that using the flash can bring out the contrast in falling snowflakes. Lastly, the article states that using a high shutter speed with a slightly higher ISO can freeze the motion of snowflakes creating a really pronounced image.
Monday, October 21, 2019


Tuesday, October 15, 2019
ART 247- Blog 6
Article: https://www.theschoolofphotography.com/freebies/nd-filters-in-depth-guide-for-beginners
For this week's blog I decided to find an article that discusses the use of neutral density (ND) filters in photography. I have seen many people using ND filters on their lenses but I wasn't entirely sure what purpose they served. This article discusses reasons why photographers use ND filters as well as how beginners can use ND filters to improve their photos.
The article describes neutral density filters as being "sunglasses" for your lens. It doesn't entirely block out the light, but it blocks it in a way that causes the light to be less intense (more neutral). When you take a landscape photo without a filter the sensor will be exposed to light for a longer time, so you'll have a faster shutter speed. When you use an ND filter, you are blocking more light from entering the sensor and therefore you have to use longer exposures/slower shutter speeds.
The article then shifts to discussing ND grad filters. Grad filters are used by photographers to darken the skies in pictures and help balance the exposure of brighter subjects. Sometimes you may have taken a great landscape photo but the skyline is the only component of the photo that is over exposed, and that's where ND grad filters come into play.
The most important aspect of ND filters is that they are created in "stops". In photography, the term stop refers to reducing the amount of light in half. For example, if you are trying to take a 2 second exposure shot without a filter, you will need to reduce the amount of light exposed to the sensor by using a 1 stop ND filter. After putting on the 1 stop ND filter, you will have to adjust the exposure/shutter speed to 4 seconds in order to compensate for the loss of light.
This chart helps the beginner photographer like myself delineate which type of ND filter to use in terms of "stops" according to the exposure time required for the shot.

Wednesday, October 9, 2019
ART 247- Blog 5
Article: https://www.colesclassroom.com/6-types-camera-lenses-explained/
For today's blog I decided to find an article that talks about the different kinds of camera lenses and the pro's and con's for using each of them. I have three different lenses for my camera. One is a fixed focal length prime lens, one is a super wide angle lens, and the last one is a mid-focal telephoto lens. With my three lenses, I am able to get the shots that I want based on the scene/object I am taking a picture of. I believe that it is not the gear you have that makes you a better photographer but rather the creativity and imagination you have to make great shots.
The article discusses the pro's and con's of Fish-eye(ultra wide), Wide-angle, standard prime, zoom, macro, and telephoto. Of all the lenses the ones that I am most interested in are wide-angle and standard prime, because I take the majority of my pictures with these type of lenses. Listed below are the pro's and con's of each as well as some sample pictures I have taken from both prime and wide-angle lenses.
Prime Lens:
- Fixed focal length
- 24, 35, 50, 85, 135 etc.
- Type of Photography: Portraits, Weddings, Street Photography
Pros
- Sharper images due to fixed aperture
- Lighter weight
- Less moveable components
- Easier to maintain
- Better in low light environments
- Great for landscape photography
Cons
- Fixed focal length (won't zoom in/out)
- Have to physically move body in order to get the shot
- Have to carry extra lenses in addition
Sample Image:

Wide-Angle:
- Adjustable focal length
- 19-35mm/24-35mm
- Types of Photography: Interiors, Landscapes, Forest Photography
Pros
- Lightweight
- Great for hiking, easy to carry in backpack
- More depth of field
- Wide area coverage
Cons
- Can't achieve compression or Bokeh effect on image
- Won't be able to create images that look distorted
Sample Image:
Wednesday, October 2, 2019
ART 247-Blog 4
Article: https://expertphotography.com/make-money-from-photography/
I have always wondered what kind of photography jobs are out there and if I would have the skillset to get paid for my photographs. Even though I am not a skilled photographer yet, my curiosity led me to research what jobs I could get as a photographer. This article outlines 11 ways someone can make money for their photography in 2019.
The article starts off by saying that someone interested in making money for their photography has to first start off by getting their name out there and advertising for themselves. The author suggests starting small at first by selling photo books or postcards because they will provide meaning as well as becoming a small advertisement for your potential business.
People that are more computer oriented may find themselves interested in editing pictures rather than taking pictures, so the article suggests that people with this skillset should edit other photographers pictures and make money that way. This would be a good job because some photographers aren't able to edit their photos when they are on a busy photoshoot.
The best option for me to make money with my photography would be to start small at first and print my photos off on post cards. This will help me advertise my photography and if it becomes popular, then I will know if this is something I could pursue as a side job in the future. If my photography became more popular than I had expected, then I would probably start up a small business and sell bigger items like prints!
Tuesday, September 24, 2019
Aperture/Shutter Speed/ISO Demonstration
Here are 4 photos that demonstrate the extremes for Aperture and Shutter Speed. ISO's were set at 100.
 |
| Aperture:F/10 Shutter Speed:1/100 ISO:100 |
 |
| Aperture: F/5 Shutter Speed: 1/400 ISO: 100 |
 |
| Aperture: F/1.8 Shutter Speed: 1/1600 ISO: 100 |
 |
| Aperture: F/2.8 Shutter Speed: 1/80 ISO: 100 |
Saturday, September 21, 2019
ART 247- Blog 3
Article:https://www.findingtheuniverse.com/reasons-you-need-a-tripod-photography/
For this week's blog I chose to write about the use of tripods in photography. Whenever I see photographers out taking landscape photography I notice that all of them tend to use tripods to take their shots. I have always just assumed that photographers were using a tripod to keep their arms from becoming to tired, but as I have come to find out, they use tripods for many other reasons.
The article outlines 11 reasons tripods are used in photography. The biggest of those reasons is photographing long exposure shots where your shutter speeds are longer than 1/60th of a second. At these slow shutter speeds it is possible to create motion blur in pictures if the camera is only being supported by someones hands. Tripods help stabilize the shot, so that you can click the shutter without any interrupted movement from your hands. I have tried to take many long exposure pictures of waterfalls and I think I have taken a cool shot, then when I look at it I realize that it has motion blur. This could have been prevented had I just used a tripod.
Another reason photographers use tripods in their photography is for landscape shots. The majority of landscape shots are taken at an aperture of F8 to F16 to ensure that there's a wide depth of field. When the aperture is increased to those higher F-stops it allows less light to enter the frame and therefore the shutter speeds have to be decreased to allow more light in the frame. When the shutter speeds are decreased however, the shot will have motion blur if not properly corrected for by a tripod. ISO values can be increased to prevent the motion blur from becoming an issue, but as ISO values are increased the photo will have a lot of additional light and appear grainy.
After reading this article, I will consider adding a tripod to my photography kit. A tripod will not only help me rest my arms all day taking photos, but it will help stabilize my camera so that I can take landscape pictures for this class!
Wednesday, September 18, 2019
ART247-Blog 2
Article: https://www.diyphotography.net/raw-vs-jpeg-guide-will-ever-need/
I chose this article because I have always wondered why people prefer shooting photos in RAW format over JPEG format. I have experimented with this by taking pictures of the same object in RAW then comparing that image to the same image taken in JPEG. I have played around with light room to distinguish the differences, but I didn't know what I was looking for. This article may have just helped me better understand the differences!
A RAW format image is basically an unprocessed image that doesn't include any filters or appealing details. A JPEG format image on the other hand is an image that can't be altered or improved. Once a JPEG image has been taken it is the final product, where as a RAW format image can be altered and improved after the image has been taken.
JPEG images take the RAW format image and run it through an internal image processing sensor in the camera. It will gauge each pixel in the image and adjust it for light intensity, then it will apply filters such as contrast, saturation, and sharpening so that the image will look more appealing to the viewers eye. A JPEG image will also adjust for the white balance settings that the user selected or auto-adjust based on the camera settings.
Lastly, RAW format pictures will help highlight mistakes that could easily go unnoticed by beginner photographers like myself. RAW photos can be properly recovered once they are transferred over to an imaging processing application like light room or photoshop. I hope that I can get more comfortable taking photos in RAW format this semester and really start to pull them apart and improve the quality in light room!
Tuesday, September 17, 2019
ART247- Intro/Blog 1
Article:
https://loadedlandscapes.com/mt-photography-locations/
I found this article to be interesting and informative for the beginner photographer like myself, because it lists destinations in the state of Montana that are popular places for nature/landscape photography. Out of all the locations listed in the article, I found the Chinese Wall to be most spectacular. I am hoping that I can find time this semester to get outside and visit a couple of these locations to take some awesome pictures.
Throughout the semester I might be able to go and visit some of these locations, because I have access to a few airplanes. Aerial photography is a lot of fun especially in the state of Montana, because regardless of where you are in this state, there is a good chance that you'll be able to get really mesmerizing photos.
Subscribe to:
Posts (Atom)